


IP Video Transcoding Live! (IPVTL) - multiple channel live transcoding software, is designed for live media streaming over the internet, cable and satellite TV digital video broadcasting, video surveillance and event webcasting.
IPVTL provides high density transcoding capability with lowest latency. Running on high performanced generic Intel / AMD64 archtecture and NVIDIA Quadro / Tesla graphics processors, IPVTL can transcode up to 64 channels 1080p H.264 video on 1 dedicated server.
IPVTL has full support of media encoding formats, from ancient to modern types, such as G.7xx, MP2/3, AMR, AAC, OPUS, AC3, H.263(+), H.264/AVC, H.265/HEVC, AV1, MPEG-1, MPEG-2 and MPEG-4, also HTML5 video formats VP8/VP9 included.
IPVTL accepts all kinds of media streaming formats, from video clips and TV capture/tuner cards, to internet streaming like HTTP, FTP, MMS, RTSP, RTMP, RTP, NDI, SRT and MPEG-TS (DVB-S). It works perfectly with most popular live streaming CDN service providers listed below Wowza Streaming Engine, Nginx-rtmp, as well as common DVB IRD devices with SDI like Dreambox® and BlackMagic Decklink cards.
 |
 |
 |
 |
| Youtube | Facebook media | Windows Media Server | Adobe Media Server |
 |
 |
 |
 |
Wowza Streaming Engine | Apple Quick Time | RealNetworks Server | DVB-S |
IPVTL provides on-demand file streaming as well. It can stream from pre-recorded video clips of any formats on your local disk, with transcoding on the fly. Scheduled folder play list is also possible (available on Windows currently).
On output side, IPVTL supports the most popular streaming protocols today - Apple HLS and Flash RTMP pushing to CDNs of Nginx-rtmp, Adobe Media Server, Wowza Streaming Engine or Red5 Media Server. MPEG-TS output in constant bitrate (CBR) is available for best compatibility with IPTV STB and other playback hardware.
IPVTL gives you full control of video and audio encoding profiles customized as per your system requirements. Video size, quality, frame rate and bit rate, you can reshape your stream fast and simple. IPVTL also provides professional video post-processes such as logo/delogo, watermarking and subtitle overlay.
For native RTP streams, the input and output media attributes can be easily imported or exported through SDP files (RFC 2327), which can then be fed to other collaborating applications in the whole scenario.
| Main Features |
|
|
|
|
We offer very competitive price against other live transcoding solutions, starting from $120 only. Once purchased, you receive lifetime working license, with 1 year free software updates and support from us. If further software updates and support is expected, subscription renewal is required annually. As an example see Pricing Comparison with Wowza Transcoder Addon below:
| Number of Channels | Wowza Transcoder Addon Pricing | IP Video Transcoding Live Pricing |
| 1 | $120 | |
| 4 | $240 | |
| 16 | $480 | |
| 64 | $960 |
We offer bulk discount to volume channel/license purchase and distributors. SDK license is also avaiable. For more pricing details about IPVTL, please don't hesitate to query sales#ipvideotrans.com.
| IP Video Transcoding Live! 16 Channel Evaluation 30 Day Free Trial Download |
Channel Manager Tool | ||
| Version 5.12.3.4 Old stable. Supports RTSP/HTTP output, with Time shifting feature |
 Installer for Windows For Windows 7/8/10, Windows Server 2008 R2/2012/2016 32/64 bit |
 Linux x64 LZMA Tarball For CentOS, Debian, Ubuntu 64 bit only (Kernel 3.10.0 or above) |
Windows Zip Package For Linux users setting up configuration on Windows |
| Version 6.1.4.4a No RTSP output. HTTP output limited to 1 client only. No time shifting. See version updates below. |
Installer for Windows For Windows 7/8/10, Windows Server 2008 R2/2012/2016 64 bit only (Visual C++ 2013 Redistributable Packages Required) |
Linux x64 LZMA Tarball For CentOS, Debian, Ubuntu 64 bit only (Kernel 3.10.x or above) |
Windows Zip Package For Linux users setting up configuration on Windows |
For Windows users, just download and run executable installer to install IPVTL to your computer. Start IPVTL from Windows Program Menu or desktop as you like. Simple and easy.
# cd /home
# tar xvf ipvtl_trial-x64.tar.xz
ipvtl/
ipvtl/libva.so.1
ipvtl/libva-drm.so.1
ipvtl/ipvtl.so
ipvtl/ipvts.so
ipvtl/ipvtl_16ch_trial
# cd ipvtl
# sudo ./ipvtl_16ch_trial

* * * * * * * * * * * * * * * * * * * * *
*      IP Video Transcoding Live!       *
*          Copyright 2009-2021          *
*           IPVideoTrans.com            *
*           Version 6.1.4.4             *
*        16 Channel Evaluation          *
*          Days to Expire: 30           *
* To purchase licenses, please contact  *
*        sales@ipvideotrans.com         *
* * * * * * * * * * * * * * * * * * * * *

IPVTL started successfully!
Web management now accessible at http://127.0.0.1:8888...
#
For Linux users, it's a bit more complicated. First, download and extract Installation tarball to local directory, /home or /opt for example. Remember to extract it WITHOUT changing file permissions inside, or IPVTL could fail to run. Then, in Linux console go to IPVTL folder, start IPVTL by entering command like ./ipvtl_16ch_trial or ./ipvtl_4ch. To quit IPVTL, simply pgrep ipvtl_ and kill IPVTL main process, or just pkill ipvtl_.
Prior to version 5.8.3.1, IPVTL users on Linux have to edit config file manually to set up transcoding, which is a big pain to start. Latest IPVTL has web interface built inside, making it possible to set up and manage channels at runtime in a web browser. The web interface is able to be accessed at http://<host_IP>:<http_port>, where host_IP is the network address of computer running IPVTL, and http_port is the HTTP service port which can be configured in Global Settings, for example http://127.0.0.1:8888/. Both Windows and Linux users may find it helpful, either setting up transcoding channels or manipulating channel status, locally or remotely.
Licensed users on Linux will be directed to license activation page on the first time accessing web interface. On that page you can import license key provided by us and activate IPVTL.
Starting from 5.10.3.3, IPVTL enhances web interface security with built-in login authentication and IP address whitelist. It is STRONGLY RECOMMENDED to set up web login password in Global Settings IMMEDIATELY after installation. Otherwise there is a risk of exposing all channels configuration on the internet.
For licensed users to upgrade IPVTL versions, just download latest installation package and do the same process as fresh install above. Old configuration will be imported into new version automatically. Old configuation can also be exported and imported by clicking buttons in Global Settings. We recommend this in case anything unexpected occurs during upgrading.
To set up transcoding channel in IPVTL, only 2 more steps below are required:
 |
| Select Media Source |
Be sure to make clear your media source type before starting. Click New Channel button to create a new transcoding channel with default settings. In the channel list panel, select appropriate streaming protocol and enter the URL of the media source.
Choose file or ftp/sftp as source type, enter the full path of the file or click "..." button to browse for the file (on Windows).
If a file folder instead of a single file is selected, the channel is set to run in play list mode. All IPVTL recoginized media files in that folder (and sub-folder) will be streamed in sequence. Play list controls like forward/backward is available during live streaming.
Choose http as source type, enter http or https m3u8_url as source media. e.g. https://my.videosite.com/live/playlist.m3u8
Choose rtmp and enter the stream URL that can be played in a swf player or VLC player, e.g. rtmp://192.168.0.1/vod/sample or rtmp://192.168.0.1/live/stream. Secured RTMP URLs including rtmps, rtmpe, rtmpt are also supported if demanded by server.
If rtmp authentication is mandatory on the source server, enter username / password in
the following format:
rtmp://<username>:<password>@<server_ip>:<port>/<app>/<stream>
Choose mms (mms over http tunnelling) as source type, enter the URL that can be played in Windows Media Player, e.g. mms://192.168.0.1/vod/playlist.wsx
Tip: Normally mms will do for most WMS servers. If there is an issue, try mmst (mms over tcp) instead.
Choose rtsp (over udp) or rtspt (over tcp) accordingly, and enter the URL that can be played in VLC player. Note rtspt (RTSP over TCP) is recommended in lossy network environment, if it is supported by the source server.
If rtsp authentication is mandatory on the source server, enter username / password in
the following format:
rtsp://<username>:<password>@<server_ip>:<port>/stream
Choose udp, rtp or http accordingly, and enter source URL, e.g.
udp://0.0.0.0:1234 (mpeg-ts over udp unicast)
udp://224.0.0.1:1234 (mpeg-ts over udp multicast)
rtp://224.0.0.1:1234 (mpeg-ts over rtp multicast)
http://192.168.0.1/mpegts (mpeg-ts over http)
Choose decklink as source type and click "..." button to select available decklink cards on your computer.
Please note you have to install Blackmagic Decklink Desktop Video software at https://www.blackmagicdesign.com/support before setup.
Choose newtek ndi as source type and click "..." button to search available NDI sources on your computer.
Note NDI sources could take long time to be detected. If no NDI sources found, try bigger timeout value and click "Search Again".
SRT makes udp streaming reliable transmission similar to TCP. You can deliver stream losslessly from one endpoint to another over internet.
Streaming from SRT source is like streaming from HTTP. Just choose srt as source type and enter srt url in source address, like srt://0.0.0.0:1234
In above case, SRT source works in listener mode, i.e. It waits for the other endpoint to connect from remote and starts streaming. If you want to switch to caller mode instead, change address to target address with option "mode=caller", like srt://192.168.1.2:1234?mode=caller. In this case, it initiates connection to the other side to start streaming.
Choose dshow and click "..." button to enumerate and choose your video / audio capture devices available to stream.
Tip: On some kind of capture cards,
video and audio can come from the same device. In that case, enter
video=<device_name>:audio=<device_name>
in the url box.
If there are more than 1 cards with a same device name, append
video_device_number and audio_device_number option (starts from 0) to the
url. For example:
video=<device_name>:audio=<device_name>?video_device_number=1&audio_device_number=1
(2nd video & 2nd audio device)
Choose v4l2 source type and enter device name in Source media, like /dev/video0.
 |
| Transcoding Panel |
First, select target stream format you demand appropriately, among RTMP, MPEG-TS over UDP/RTP/HTTP, m3u8 Playlist (HLS), MPEG DASH, Decklink playback card and Native RTP. Then enter target address and modify encoding details if necessary. You can change video resolution, frame rate, quality level, encoding bitrate and audio sample rate, etc.
IPVTL works with 3rd party RTMP server like Nginx-rtmp, Adobe Flash Media Server and Wowza streaming engine. Before setting up RTMP output, please make sure you have got either RTMP server of your own or streaming CDN from your provider running properly, with a valid RTMP publishing URL.
The format of a full RTMP publishing URL is normally:
rtmp://<server_domain/ip>:<port>/<app>/<stream_name>
Tip: You can verify the publish url using Adobe Flash Media Live Encoder. A Full RTMP publish URL = <Server URL> + "/" + <Stream Name/Key>
For example,
A publishing URL for Youtube live:
rtmp://a.rtmp.youtube.com/live2/1234-5678-9ABC-DEFG
A publishing URL for Facebook media live:
rtmps://rtmp-api.facebook.com:443/rtmp/1226334177416540?ds=1&s_l=1&a=AabUoS3yJSRhM2T
And a publishing URL for Adobe FMS HLS:
rtmp://192.168.0.1:1935/livepkgr/livestream?adbe-live-event=liveevent
If RTMP publish authentication is mandatory on the server, go to Advanced Format Settings -> RTMP Config and enter confidentials there. (See RTMP Options in Advanced Settings below)
Tip: Typically RTMP uses H.264 in video encoding. Since v6.1.4.4, IPVTL started to support H.265/HEVC in RTMP as well, using an extended FLV format of type 12 in videoTag.codecId.
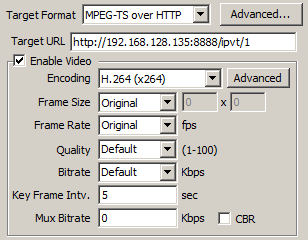
Choose MPEG-TS over UDP in Target Format, and enter target UDP/RTP address (IP:Port) on receiving side. Both muticast and unicast addresses are allowed, for example udp://192.168.0.1:1234 (udp unicast), or rtp://224.0.0.1:1234 (rtp multicast).
Tip: Some DVB IRDs require strict compliance to MPEG TS standard, like constant bit rate. To stream to those devices, make sure to use IPVTL version 6.1.4.4 at least, with Mux Bitrate option and CBR enabled. See CBR Settings below.
Please understand normally UDP/RTP streaming works in local network only. It is not recommended to do so over internet, as UDP transportation would not be so reliable.
If you are using version 5.12.3.4, first please configure HTTP Port to be bound to your local network interface in Global Settings. The default port number is 8888. Change it if necessary and make sure the port is not occupied by any other application on your machine. Restarting program is recommended once HTTP Port is changed.
As stream is output on local network interface, Target URL is fixed and is not allowed to be modified in this case. The output URL is provided in http://<host_IP>:<http_port>/ipvt_###, for example http://192.168.1.1:8888/ipvt_001. The URL can then be used to feed to streaming servers, or to be played in streaming players like VLC.
Starting from version 5.12.4.1, http output channels don't share the same port any more. Please make sure to specify different port numbers for different channels.
Tip: IP 127.0.0.1 in Target
URL is just for demonstration. Actually client streamers can access the output
stream with ALL IP addresses bound to NICs on the host computer, by just
replacing 127.0.0.1 in Target URL with your preferred IP.
Although MPEG-TS over HTTP streaming can work over internet, it
is not designed to provide stream distribution to volume end users directly. To do that,
please try 3rd party media streaming servers, like Wowza server and Nginx (see below).
Attention: On system without network
firewall enabled, there is a risk of HTTP streams being exposed on the internet
to unexpected streamers. To secure your HTTP streams, go to Global Settings to locate
and edit IP address ACL (access control list) file. Put client IP addresses in blacklist
or whitelist in following syntax:
ACL deny 1.2.3.4
ACL allow 192.168.1.2
ACL deny 192.168.100.1 192.168.100.10
Note ACL also affects web config interface, so use it with caution.

First of all, please understand IPVTL DOES NOT output Apple HLS directly. Instead, it outputs stream index file (.m3u8) and segment files (.ts) on your local disk. These files can then be fed to web server like Nginx, Apache or Microsoft IIS to provide HLS to end player running in user Apps or browsers.
In Windows version, the default output index file name is C:\stream.m3u8. And segment files will be generated in C:\stream-###.ts. You can edit in Target URL and change it to your perferred folder and file name. For example put them under your web server publish folder to be auto-loaded by the server.
More HLS settings can be found in Format Advanced Settings. You can define ts segment length, index rules and other details there.
Best Practice - Working with Nginx to provide Apple HLS streaming
http {
    ...
    server {
        ...
        location /hls {
            types {
                application/vnd.apple.mpegurl m3u8;
                video/mp2t ts;
            }
            root media;
            add_header Cache-Control no-cache;
        }
        ...
    }
    ...
}
If both Nginx and IPVTL channel start successfully, the output stream should be able to access at http://<nginx_server_ip>/hls/stream.m3u8.
First of all, please understand IPVTL DOES NOT output MPEG DASH stream directly. Instead, it outputs MPEG DASH index files (.mpd) and segment files (.m4s) on your local disk. These files can then be fed to web server like Nginx, Apache or Microsoft IIS to provide MPEG DASH streaming to end players.
In Windows version, the default output index file name is C:\stream.mpd. And segment files will be generated in C:\init-stream#.m4s and C:\chunk-stream#-#####.m4s. You can edit in Target URL and change it to your perferred folder and file name. For example put them under your web server publish folder to be auto-loaded by the server.
SRT makes udp streaming reliable transmission similar to TCP. You can deliver stream losslessly from one point to another over internet.
To do that, Choose SRT in Target Format and enter destination IP address you want to deliver to. For example srt://192.168.1.2:1234.
In above case SRT works in caller mode, i.e. It connects to the other SRT endpoint to start streaming. If you want to switch to listener mode instead, change address with option "mode=listener", like srt://0.0.0.0:1234?mode=listener. In this case, it waits for the other side to connect and starts streaming.
Select "Decklink Playback Card" as Target Format, and click "..." button to select available decklink cards with desired output format on your computer.
Please note you have to install Blackmagic Decklink Desktop Video software at https://www.blackmagicdesign.com/support before setup.
Select Newtek NDI as Target Format and enter NDI name (default to "IPVTL##") your prefer in Target URL.
First please configure RTSP Port to be bound to your local network interface in Global Settings. The default port number is 5544. Change it if necessary and make sure the port is not occupied by any other application on your machine. Restarting program is required once RTSP Port is changed.
Like HTTP output format, RTSP Target URL is fixed and is not allowed to be modified in this case. The output URL is provided in rtsp://<host_IP>:<rtsp_port>/ipvt-###, for example rtsp://192.168.1.1:5544/ipvt-001. The URL can then be used to feed to streaming servers, or to be played in streaming players like VLC.
The last version supports RTSP Output is version 5.12.3.4. Please make sure to download the correct version to output RTSP.
You may import and export media attributes through SDP format (See IETF RFC 2327) files by clicking Import SDP and Export SDP buttons. That makes configuration much easier. SDP is a universal method to describe media streams in RTP format. It is widely used together with other multimedia transporting protocols such as SIP and RTSP. Many network stream media players like VLC and QuickTime support SDP file playback.
Once you've finished with the settings, click Apply button to validate and save your configuration. You can always change transcoding settings by clicking Edit button at a later time. But remember setting changes won't make effect to a live channel, until the channel is restarted.
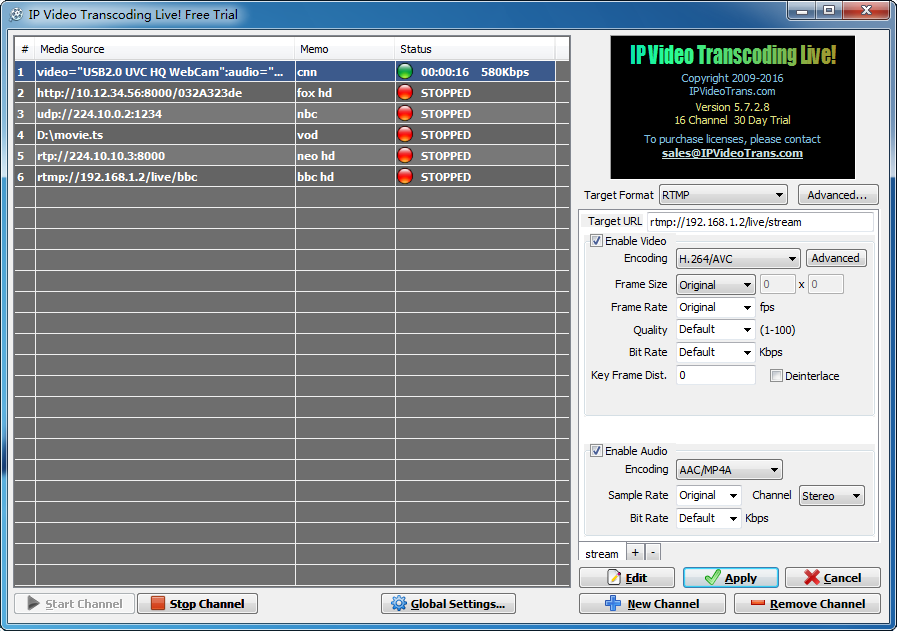
After a new transcoding channel is set up, you may enter some memo about the channel
in the list to keep it simple to identify. The red light in the last column
( )
indicates the channel is not started yet. Click Start button to start
transcoding. If everything is OK, the status light will switch to green (
)
indicates the channel is not started yet. Click Start button to start
transcoding. If everything is OK, the status light will switch to green ( ),
which means the channel is running good now. You can then validate the output stream
in your end device or VLC player (
),
which means the channel is running good now. You can then validate the output stream
in your end device or VLC player ( http://www.videolan.org/vlc)
, a very handy tool.
http://www.videolan.org/vlc)
, a very handy tool.
If there is any problem however, please try FAQ
below, or send feedback to support#ipvideotrans.com
with your channel settings and channel log file to get a diagnosis. To get channel
log file, enable Debug Log in Global Settings before starting the channel.
IPVTL config file and log files are located in:
By default all transcoding channels share all logical processors on the server. Sometimes it could result in unbalanced CPU usage on server with multiple physical processors. CPU affinity management can bring CPU load balance and thus improve overall capability of transcoding. You need to enter the number of cores to be assigned to single channel, for example 2 cores per channel on a 16 core computer.
It is not recommended to be enabled on server of less than 8 cores.

To enable adaptive bitrate streaming, you need to create multiple bitrate profiles. IPVTL supports up to 5 profiles per channel, for RTMP, HLS, and MPEG TS over UDP stream formats.
To set up multiple bitrate profiles, create or delete profiles by clicking "+" or "-" button on bottom of encoding settings panel. In each profile, you can define different video sizes, bitrates and even encodings. Make sure to specify a distinguishing output address for each profile. And remember to set a same Key Frame Intv. for all profiles to keep video key frames aligned.
It's obvious multipe bitrate transcoding channel will require more computing than single bitrate one. So choose your hardware specification wisely.

If you are streaming from Multi Program Transport Stream (MPTS), you are able to decide which programs / channels in the source stream are to be output, by picking either program # or stream PIDs in it.
PID can also be used to pass through dvb subtitle in UDP MPEG TS output format. To do that, make sure to select the correct subtitle PID in the source.
| Flash Version String | Customized identification for publishing client (leave it empty if you are not sure) |
| SWF URL Verify | RTMP stream URL for server verification (leave it empty if you are not sure) |
| Publish Username / Password | Publishing authentication required by RTMP server (Both Adobe and Limelight authenticating methods are supported) |

If you are streaming into HLS format, you can specify more details about index file (.m3u8) and segment file (.ts) to be generated, including segment length, playlist entry size and the rule of segment index number.
You can also enter a base URL if it is required to be put in .m3u8 index.

MPEG-TS output metadata fields can be configured here, including Program/Service ID, Program Name, Start PID and Provider Name.
Set time delay and cache file folder for output stream. The input stream will be cached and delayed exactly the time you enter before being output. Please make sure there's sufficient disk space for cache files.

| Profile & Level | H.264/HEVC encoding conformance. Please refer to http://en.wikipedia.org/wiki/H.264#Profiles. |
| Threads | Specify how many threads are to be used for encoding. This setting can be used to tune encoding performance. |
| Encoding Preset | Bigger preset value leads to better video quality, but at the cost of higher CPU utilization. Choose smaller values to get more smooth output on slow machines. In most cases this value should be kept less than 6. |
For video encodings other than H.264 and HEVC, output video quality can be specified here from 1 to 100. Remember higher quality level leads to higher video bitrate. In most cases, this option can be left as Default, indicating outputting almost the same quality as input.
Note: DO NOT set video quality for H.264 or HEVC encoding. Instead, tune Encoding Preset in advanced video settings (see above).

IPVTL outputs video stream in variable bitrate (VBR) by default. If you want to specify video output bitrate, please choose it wisely as low output bitrate could make video quality bad, creating artifacts during playback. Setting both video bitrate and video quality is NOT recommended.
Constant bitrate (CBR) stream is mostly required by legacy DVB IRDs. To set up CBR output, enter proper values for both Video Bitrate and Mux Bitrate in encoding settings. That will produce CBR stream compliant with DVB ETSI TR 101 290. Note that Mux Bitrate must be some higher than <Video bitrate> + <Audio bitrate>. For example, video bitrate = 1600kbps, audio bitrate = 128kbps, while Mux bitrate = 2000kbps.
Key Frame Interval, formerly Key Frame Distance in IPVTL, defines time in seconds (defautls to 5) between key frames in video stream for decoders. Prior to version 5.9.3.0, it is called key frame distance and is calculated in video frames. For HLS output format, it also affects the .ts segments duration. Users just need to set Segment Length in advanced HLS options and key frame interval will be changed accordingly. If you have no idea about it, just leave it as default.

During transcoding, it is possible to overlay customized logo and image on the video. To do that, go to advanced video settings -> Overlay, and select a picture file you prefer. Supported picture formats include .bmp / .jpg / .png / .gif. Choose .png / .gif formats to overlay with transparent background.
Animated logo is also possible, by selecting an animated GIF file as logo.
To overlay timestamp, enter %timestamp as overlay text.
IPVTL utilizes both CPU and GPU encoding technique. The transcoding capacity is basically decided by both the CPU/GPU performance and the video encoding profile you demand. For high density transcoding, we recommend private server with Intel Xeon processsor or NVIDIA Quadro/GRID/Tesla graphics card installed, as they have better parallel computing performance. Use calculator in table below to get rough idea of choosing hardware.
| H.264 Transcoding Hardware Spec Recommendation | |||
| Output Video Profile | # of Channels | Minimum CPU/GPU Requirement | |
| Desktop | i7-5960X | ||
| Server | Xeon e5-2620v3 Dual | ||
Note: # of channels above are evaluated with pure video transcoding. If video transizing, overlay or other functions are enabled in the channel, more cpu / gpu resources could be involved.
Remember to have a look at CPU load indicator at the bottom of IPVTL Windows or web
UI during transcoding. It tells current CPU usage per core and you get the idea whether
the system performance is good for the transcoding jobs right now.

Requirements in system / GPU memory can be calculated by 100MB per channel.
HEVC/H.265/AV1 transcoding requires very much more calculation than H.264/AVC does. On most CPUs, hevc/av1 transcoding could be dead slow. In this case, NVIDIA Quadro/Tesla card with Maxwell/Pascal GPUs, or Intel 6th/7th generation Core processor (Skylake & Kaby Lake) with Quick Sync Video acceleration is recommended. For HEVC enabled NVIDIA video card specs, visit NVIDIA Video Encode and Decode GPU Support Matrix.
IPVTL is designed for live media transcoding only. Although IPVTL can output mpeg ts over http format, it is NOT supposed to provide media stream distribution for volume audience over the internet. You will need 3rd party media streaming server to do that, like Nginx, Wowza media server and Adobe media server, etc.
See How to setup IPVTL with Nginx above.
You can screencast using IPVTL on Windows. To do that, select "file" as channel source format and enter "desktop" as source name. Then go to advanced format settings -> Custom Options, and enter "-f gdigrab -framerate 5" in Source Options box.
Several possible reasons:
If there are still problems, please send us feedback via email to support[at]ipvideotrans.com. In your feedback, please let us know your detailed transcoding settings and attach channel log files if possible. To get channel log files, please enable Debug Log in IPVTL Global Settings before starting the channel.
Check transcoding source validy and ensure IPVTL is receiving input stream with tools mentioned above. Make sure VLC is running exactly on IPVTL's output address and is receiving stream out from IPVTL. Open message log in VLC (Tools->Messages) and set log level to max to see full logs. If you are transcoding video stream into H.263, remember VLC DOES NOT support H.263 RTP stream playing (only H.263+).
If still no video output, please enable Debug Log in IPVTL global settings and send channel log file back to us (support[at]ipvideotrans.com) to diagnose.
IPVTL log files are named in ipvt_###.log and are located in:
Starting from version 5.8.3.1, IPVTL has built-in web UI for Linux users to set up and manage channels at runtime. Please refer to Setup Section for details.
IPVTL web UI is now full featured as Windows UI since version 6.1.4.4. By default, web UI binds all network interfaces on localhost. You can open http://<any_ip_on_ipvtl_host>:8888 in browser to access it. If you want to secure web UI from malicious access, it is possible through an ACL config file set up in Global Settings. The ACL config syntax is very like in nginx:
deny all
allow 127.0.0.1/8
or
allow all
deny 1.2.3.4
Starting from version 5.10.3.0, web login is required to access IPVTL web interface. Login password is empty by default and can be configured in Global Settings. Make sure to set up password IMMEDIATELY after installation, and keep it safe! Otherwise all channel configuration details could be exposed on the internet.
Also IPVTL has now built-in IP address ACL (access control list) to secure http streams from unexpected streamers. You can edit ipvtl.acl and blacklist or whitelist client IP addresses there. See more in setup instructions.
IPVTL runs as daemon on Linux from version 5.9.3.0. It is possible to start IPVTL in remote ssh login without nohup now. To stop IPVTL running, simply pgrep ipvtl_ and kill IPVTL main process, or just pkill ipvtl_. Remember to JUST kill, NOT kill -9 (SIGKILL) as it is not a safe way.
On Windows, simply open Global Settings and enable Auto Start on System Boot option. Be noted IPVTL does NOT run as Windows service. It still requires user to login Windows before running.
On Linux, you may accomplish it using cron or rc.local scripts. For cron, enter $ sudo crontab -e under console and add line @reboot <IPVTL_with_full_path>. For rc.local, just edit /etc/rc.local and add IPVTL command with full path.
Absolutely not. IPVTL software license is bound to per server instance. If you want to run it on more than 1 server instances, please consider purchasing multiple licenses.
First please make sure the source video quality is fine using tools like vlc player. Remember there is always quality loss during transcoding. You CAN NEVER get better output quality than the source.
If you want to tune video quality for H.264 / HEVC encoding, please try different Encoding Preset in advanced video settings (see in setup instructions). Setting video Quality in the main gui is NOT recommended and it should be kept as default.
For other video encodings than H.264 and HEVC, setting video Quality and video Bitrate can both impact the output quality. Make sure the video bitrate is not set too low. If you don't understand about bitrate, just leave it default.

First of all make sure your processor is capable of Intel QSV here. Utilizing Intel QSV acceleration on Windows is recommended, as setup procedures are much easier than on Linux. On Windows, you just need to install Intel HD Graphics driver and make sure the driver has been updated to latest version. Outdated video driver could cause unexpected transcoding problems. If the driver is installed correctly, you can set channel's Video Encoding to Intel QuickSync H.264/HEVC to enable QSV accelerated transcoding.
To enable Intel QSV on Linux is a bit more complicated. You need to install Intel Media Server Studio (MSS) as an essential prerequisite, which includes Intel HD video kernel driver in it. Check processor support matrix below and choose proper Linux OS and MSS version suits your system. Find detailed install instructions in Intel Media Server Studio Getting Started Guide.
| Processor Arch. | MSS Version | Linux Recommended | H.264/AVC | H.265/HEVC |
|---|---|---|---|---|
| 3rd Gen (Ivy Bridge) | 2015 | Ubuntu 12.04 SLES 11.3 | ✔ | ✖ |
| 4th Gen (Haswell) | 2015/2016 | CentOS 7.1 | ✔ | ✖ |
| 5th Gen (Broadwell) | 2015/2016/2017 | CentOs 7.2 | ✔ | ✖ |
| 6th Gen (Skylake) | 2017 | CentOS 7.2 | ✔ | ✔ |
| 7th/8th Gen (KabyLake & CoffeeLake) | 2017 | CentOS 7.2 | ✔ | ✔ |
Note: Currently, only 7th, 8th and 9th generation Intel Core processors are supported by IPVTL offiicial release on Linux. If you want to run it on older Intel processors, please inquire for us.
Before running IPVTL, verify Intel Media Server Studio and iHD drivers installation using vainfo as per Intel's guide doc. If everything is ok, you can set channel video encoding to Intel QuickSync H.264/HEVC to enable QSV accelerated transcoding then.

First of all make sure you have at least 1 NVIDIA video card capable of NVENC here. Then you need to install the latest NVIDIA video driver to enable NVENC acceleration. In IPVTL channel config, set video encoding to NVIDIA NVENC H.264 or NVIDIA NVENC HEVC to enable NVENC accelerated transcoding.
But be noted you only enable half GPU performance so far. CPU is still working on Video decoding and resizing at this moment. To enable full GPU performance, select NVDEC decoding H.264 or HEVC (as per your source signal) in advanced vide settings -> Misc tab. This will leave video decoding, resizing and deinterlacing (if required) to GPU with zero data copy. No CPU resources will be involved!
That's it. If you have multiple NVIDIA cards installed, remember to specify which card to be assigned in Misc settings as well.
Note: NVIDIA GeForce GPU and Quadro under K2000/M2000/P2000 GPU has a limit of 3 encoding sessions per system. It is a limit by NVIDIA driver. Other Quadro models, Tesla or GRID don't have such limit.
From version 5.12.3.4, NVIDIA NVDEC/CUVID for h.264/hevc decoding is also supported, which would release more CPU time from video decoding. Go to advanced video settings -> Misc. tab to enable it.

If you want to monitor NVENC utilization on your gpu card, GPU-Z tool is recommended for Windows. In Sensors tab, please note to watch Video Engine Load that reflects current NVDEC/NVENC working load. Not "GPU Load", which reflects 3D-modeling load instead. If you have more than 1 gpu cards, select and watch them separatedly to keep good balance in multiple transcoding channels.

IPVTL supports 2 kinds of subtitle:
1) dvb subtitle pass through in MPEG TS over UDP format
2) srt/webvtt subtitle pass through in HLS segments
To pass through dvb subtitle in MPEG TS UDP output format, nothing needs to be done on user side. IPVTL automatically selects subtitle streams to output. If you want to specify some particular subtitle to output, please use Source Stream Selection settings above. Make sure to select the proper subtitle pid you prefer.
If you are streaming to other kind of formats than UDP, say rtmp, you may want to hardcode dvb subtitle over video, rather than passing it through. This is possible via IPVTL advanced options. Open channel format settings -> Custom Options and in Target Options box, enter option "-filter_complex '[0:v][s:0]overlay[v]' -map [v]".
You can specify network interface to bind for receiving or sending udp stream. To do that, append option "localaddr=<IP_ADDR>" to the stream url. For example, udp://224.0.0.1:1234?localaddr=192.168.0.1 means to use network interface with IP 192.168.0.1 for udp multicast.
You need to enable CBR encoding mode. See how to enable CBR encoding above.
That is true, unfortunately. It is not big problem if you are streaming to udp format. However, it would be annoying when streaming to other kind of formats, like rtmp.
To get over with it, we need to utilize another channel. In that channel, set output to MPEG TS over UDP format and specify a local address, like udp://127.0.0.1:1234. Then in the original channel, set input to udp://0.0.0.0:1234 and leave output encodings to Original to save CPU resources. That will do the trick.
It could be due to long key frame interval in output video. By default IPVTL produces video at 5 seconds key frame interval for better video quality. To shorten the prebuffer time you may try setting Key Frame Interval to a smaller value. See how in Advanced Settings above.
IPVTL evaluation does not run in VMware. Please try it on real machines instead. IPVTL licensed version does run on VMs, however.
First, if the result Frame Size and Frame Rate does not matter much, you can lower them to save bandwidth dramatically. For example, switch frame size from CIF to QCIF, or reduce frame rate from 30 to 15 fps.
Second, the Quality Level and Bandwidth settings both impact output video encoding bitrate. To control video encoding bitrate effectively, revert Quality Level to Original first. Then tune Bandwidth value to make video bitrate at your level. Remember: Low encoding bitrate always leads to low video quality.
If you've got a critical bandwidth limit, you can also try increasing video Key Frame Interval (to 120 or larger, through configuration file mentioned above) and switching Global Header from InBand to OutOfBand.
Yes it is because HEVC has very much more complexity in encoding algorithm than H.264. There is always trade-off between performance and speed. You may try HEVC on a much faster processor, or switch to GPU accelerated HEVC encoding instead.
IPVTL default H.264 encoding settings will indroduce about 50ms delay. If you have a strict demand of transcoding delay, please try advanced option "-tune zerolatency" in Custom Target Options.
© 2009-2021 IPVideoTrans.com All rights reserved.