For Windows users, just download and run executable installer to install IPVTL to your computer. Start IPVTL from Windows Program Menu or desktop as you like. Simple and easy.
For Linux users, it's a bit more complicated. First, download and extract tarball to local disk, /home or /opt for example. Remember to extract it WITHOUT changing file permissions inside, or IPVTL could fail to run.
Then, start Linux console in IPVTL folder, and enter command like ./ipvtl_16ch_trial or ./ipvtl_4ch to start program. To quit IPVTL, simply pgrep ipvtl_ and kill IPVTL main process, or just pkill ipvtl_.
# cd /home # tar xvf ipvtl_trial-x64.tar.xz ipvtl/ ipvtl/libva.so.1 ipvtl/libva-drm.so.1 ipvtl/ipvtl.so ipvtl/ipvts.so ipvtl/ipvtl_16ch_trial # cd ipvtl # sudo ./ipvtl_16ch_trial * * * * * * * * * * * * * * * * * * * * * * IP Video Transcoding Live! * * Copyright 2009-2021 * * IPVideoTrans.com * * Version 6.1.4.4 * * 16 Channel Evaluation * * Days to Expire: 30 * * To purchase licenses, please contact * * sales@ipvideotrans.com * * * * * * * * * * * * * * * * * * * * * * IPVTL started successfully! Web management now accessible at http://127.0.0.1:8888... #
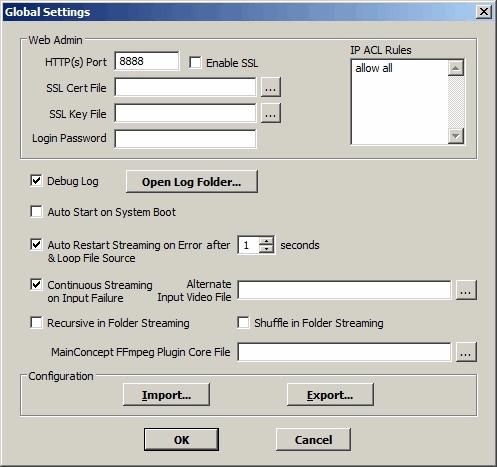
Prior to version 5.8.3.1, IPVTL users on Linux have to edit config file manually to set up transcoding, which is a big pain for startup. Latest IPVTL has web UI built inside, making it possible to set up and manage channels in a web browser like in Widnows. The web UI can be accessed at http://<host_IP>:<http_port>, where host_IP is IPVTL's local host network address, and http_port is the HTTP service port which is configured in Global Settings, for example http://127.0.0.1:8888/.
IPVTL web UI is available on both Windows and Linux. Even Windows users may use it to set up or manage transcoding channels from remote.
For the first time running IPVTL licenses, it is required to import and activate license key. Contact our sales if you don't have license key after purchase.
Starting from 5.10.3.3, IPVTL enhances web UI security with built-in user authentication and IP address whitelist. It is STRONGLY RECOMMENDED to set up web login password in Global Settings IMMEDIATELY after installation. Otherwise there is a risk of all channels configuration being exposed to the internet.
For licensed users to upgrade IPVTL, just download latest installation package and do the same process as fresh install above. Old configuration will be imported into new version automatically.
Old configuation can also be exported and imported by clicking buttons in Global Settings. We recommend doing this in case anything unexpected occurs during upgrading.
To set up transcoding channel in IPVTL, there are only 2 basic steps: Media Source and Media Target.
Before setting up everything, make sure of your source stream type first.
Click New Channel button to create a new transcoding channel with default settings. In the channel list panel, select appropriate streaming protocol and enter the URL of the media source.
Choose file or ftp/sftp as source type, enter the full path of the file or click "..." button to browse for the file (on Windows).
If a file folder instead of a single file is selected, the channel is set to run in play list mode. All IPVTL recoginized media files in that folder (and sub-folder) will be streamed in sequence. Play list controls like forward/backward is available during live streaming.
Choose http as source type, enter http or https m3u8_url as source media. e.g. https://my.videosite.com/live/playlist.m3u8
Choose rtmp and enter the stream URL that can be played in a swf player or VLC player, e.g. rtmp://192.168.0.1/vod/sample or rtmp://192.168.0.1/live/stream. Secured RTMP URLs including rtmps, rtmpe, rtmpt are also supported if demanded by server.
If rtmp authentication is mandatory on the source server, enter username / password in
the following format:
rtmp://<username>:<password>@<server_ip>:<port>/<app>/<stream>
Choose rtsp (over udp) or rtspt (over tcp) accordingly, and enter the URL that can be played in VLC player. Note rtspt (RTSP over TCP) is recommended in lossy network environment, if it is supported by the source server.
If rtsp authentication is mandatory on the source server, enter username / password in
the following format:
rtsp://<username>:<password>@<server_ip>:<port>/stream
Choose udp, rtp or http accordingly, and enter source URL, e.g.
udp://0.0.0.0:1234 (mpeg-ts over udp unicast)
udp://224.0.0.1:1234 (mpeg-ts over udp multicast)
rtp://224.0.0.1:1234 (mpeg-ts over rtp multicast)
http://192.168.0.1/mpegts (mpeg-ts over http)
Choose decklink as source type and click "..." button to select available decklink cards on your computer.
Please note you have to install Blackmagic Decklink Desktop Video software at https://www.blackmagicdesign.com/support before setup.
Choose newtek ndi as source type and click "..." button to search available NDI sources on your computer.
Note NDI sources could take long time to be detected. If no NDI sources found, try bigger timeout value and click "Search Again".
SRT makes udp streaming reliable transmission similar to TCP. You can deliver stream losslessly from one endpoint to another over internet.
Streaming from SRT source is like streaming from HTTP. Just choose srt as source type and enter srt url in source address, like srt://0.0.0.0:1234
In above case, SRT source works in listener mode, i.e. It waits for the other endpoint to connect from remote and starts streaming. If you want to switch to caller mode instead, change address to target address with option "mode=caller", like srt://192.168.1.2:1234?mode=caller. In this case, it initiates connection to the other side to start streaming.
Choose dshow and click "..." button to enumerate and choose your video / audio capture devices available to stream.
Tip: On some kind of capture cards,
video and audio can come from the same device. In that case, enter
video=<device_name>:audio=<device_name>
in the url box.
If there are more than 1 cards with a same device name, append
video_device_number and audio_device_number option (starts from 0) to the
url. For example:
video=<device_name>:audio=<device_name>?video_device_number=1&audio_device_number=1
(2nd video & 2nd audio device)
Choose mms (mms over http tunnelling) as source type, enter the URL that can be played in Windows Media Player, e.g. mms://192.168.0.1/vod/playlist.wsx
Tip: Normally mms will do most cases. If there is an issue, try mmst (mms over tcp) instead.
Choose v4l2 source type and enter device name in Media Source, like /dev/video0.
First, select target stream format you demand appropriately, among RTMP, MPEG-TS over UDP/RTP/HTTP, m3u8 Playlist (HLS), MPEG DASH, Decklink playback card and Native RTP. Then enter target address and modify encoding details if necessary. You can change video resolution, frame rate, encoding profile/bitrate and audio sample rate, etc.
IPVTL works with 3rd party RTMP server like Nginx-rtmp, Adobe Flash Media Server and Wowza streaming engine. Before setting up RTMP output, make sure you have a working RTMP publishing URL. It can be from either your own RTMP server, or a streaming CDN from your service provider.
A full RTMP publishing URL is normally like:
rtmp://<server_domain/ip>:<port>/<app>/<stream_name>
Tip: You can verify the publish url using Adobe Flash Media Live Encoder. A Full RTMP publish URL = <Server URL> + "/" + <Stream Name/Key>
For example,
A publishing URL for Youtube live:
rtmp://a.rtmp.youtube.com/live2/1234-5678-9ABC-DEFG
A publishing URL for Facebook media live:
rtmps://rtmp-api.facebook.com:443/rtmp/1226334177416540?ds=1&s_l=1&a=AabUoS3yJSRhM2T
And a publishing URL for Adobe FMS HLS:
rtmp://192.168.0.1:1935/livepkgr/livestream?adbe-live-event=liveevent
If RTMP publish authentication is mandatory, go to Advanced Format Settings -> RTMP Config and enter confidentials there. (See RTMP Options in Advanced Settings below)
Tip: Traditionally, RTMP uses H.264 video encoding. Since v6.1.4.4, IPVTL supports H.265/HEVC in RTMP as well, utilizing an extended FLV format of type 12 in videoTag.codecId as agreed by most modern CDNs.
Since v6.2.4.4, IPVTL supports HTML5 MP4 video output. Choose MP4 over HTTP in Target format, and enter local http/https url with port in Target URL, like http://0.0.0.0:1234.
After channel starts up, output video can be previewed in IPVTL web config page.
To output secured http instead of http, you need to enable SSL and provide SSL certificate key files in Global Settings -> Web Interface first.
Choose MPEG-TS over UDP in Target Format, and enter target UDP/RTP address (IP:Port) on receiver side. Both muticast and unicast addresses are allowed, for example udp://192.168.0.1:1234 (udp unicast), or rtp://224.0.0.1:1234 (rtp multicast).
Tip: Some DVB IRDs require strict compliance to MPEG TS standard, like constant bit rate. To stream to those devices, make sure to use IPVTL version 6.1.4.4 at least, with Mux Bitrate and CBR enabled. See CBR Settings below.
Please understand UDP/RTP streaming works in local network only. It is not recommended to use it over internet, as UDP transportation would not be so reliable. For internet stream delivery, consider SRT instead.
If you are using version 5.12.3.4, first please configure HTTP Port to be bound to your local network interface in Global Settings. The default port number is 8888. Change it if necessary and make sure the port is not occupied by any other application on your machine. Restarting program is recommended once HTTP Port is changed.
Also in v5.12.3.4, Target URL is fixed and not customizable. The output URL format is http://<host_IP>:<http_port>/ipvt_###, for example http://192.168.1.1:8888/ipvt_001. The URL can then be fed to streaming servers, or played in streaming players like VLC.
From version 5.12.4.1, http output channels don't share the same port any more. Please make sure to specify different port numbers for different channels.
Tip: IP 127.0.0.1 in Target
URL is just for demonstration. Actually client streamers can access the output
stream with ALL IP addresses bound to NICs on the host computer, by
replacing 127.0.0.1 with your preferred IP.
Although MPEG-TS over HTTP streaming can work over internet, it
is not designed to provide stream distribution to large scale end users directly. To do that,
try 3rd party media streaming servers, like Wowza server and Nginx (see below).
Version 5.12.3.4 or earlier: On system without network
firewall enabled, there is a risk of HTTP streams being exposed on the internet
to unexpected streamers. To secure your HTTP streams, go to Global Settings to locate
and edit IP address ACL (access control list) file. Put client IP addresses in blacklist
or whitelist in following syntax:
ACL deny 1.2.3.4
ACL allow 192.168.1.2
ACL deny 192.168.100.1 192.168.100.10
Note ACL also affects web config interface, so use it with caution.
First of all, please understand IPVTL DOES NOT output Apple HLS directly. Instead, it outputs stream index file (.m3u8) and segment files (.ts) on your local disk. These files can then be fed to web server like Nginx, Apache or Microsoft IIS to provide HLS to end player running in user Apps or browsers.
In Windows version, the default output index file name is C:\stream.m3u8. And segment files will be generated in C:\stream-###.ts. You can edit in Target URL and change it to your perferred folder and file name. For example put them under your web server publish folder to be auto-loaded by the server.
More HLS settings, like segment length, playlist entry size and encryption (DRM) can be found in Format Advanced Settings.
Best Practice - Working with Nginx to provide Apple HLS streaming
http { ... server { ... location /hls { types { application/vnd.apple.mpegurl m3u8; video/mp2t ts; } root media; add_header Cache-Control no-cache; } ... } ... }
If both Nginx and IPVTL channel start successfully, the output stream should be able to access at http://<nginx_server_ip>/hls/stream.m3u8.
First of all, please understand IPVTL DOES NOT output MPEG DASH stream directly. Instead, it outputs MPEG DASH index files (.mpd) and segment files (.m4s) on your local disk. These files can then be fed to web server like Nginx, Apache or Microsoft IIS to provide MPEG DASH streaming to end players.
In Windows version, the default output index file name is C:\stream.mpd. And segment files will be generated in C:\init-stream#.m4s and C:\chunk-stream#-#####.m4s. You can edit in Target URL and change it to your perferred folder and file name. For example put them under your web server publish folder to be auto-loaded by the server.
SRT makes udp streaming reliable transmission similar to TCP. You can deliver stream losslessly from one point to another over internet.
To do that, Choose SRT in Target Format and enter destination IP address you want to deliver to. For example srt://192.168.1.2:1234.
In above case SRT works in caller mode, i.e. It connects to the other SRT endpoint to start streaming. If you want to switch to listener mode instead, change address with option "mode=listener", like srt://0.0.0.0:1234?mode=listener. In this case, it waits for the other side to connect and starts streaming.
Select "Decklink Playback Card" as Target Format, and click "..." button to select available decklink cards with desired output format on your computer.
Please note you have to install Blackmagic Decklink Desktop Video software at https://www.blackmagicdesign.com/support before setup.
Select Newtek NDI as Target Format and enter NDI name (default to "IPVTL##") your prefer in Target URL.
First please configure RTSP Port to be bound to your local network interface in Global Settings. The default port number is 5544. Change it if necessary and make sure the port is not occupied by any other application on your machine. Restarting program is required once RTSP Port is changed.
Like HTTP output format, RTSP Target URL is fixed and is not allowed to be modified in this case. The output URL is provided in rtsp://<host_IP>:<rtsp_port>/ipvt-###, for example rtsp://192.168.1.1:5544/ipvt-001. The URL can then be used to feed to streaming servers, or to be played in streaming players like VLC.
The last version supports RTSP Output is version 5.12.3.4. Please make sure to download the correct version to output RTSP.
You may import and export media attributes through SDP format (See IETF RFC 2327) files by clicking Import SDP and Export SDP buttons. That makes configuration much easier. SDP is a universal method to describe media streams in RTP format. It is widely used together with other multimedia transporting protocols such as SIP and RTSP. Many network stream media players like VLC and QuickTime support SDP file playback.
Once you've finished with the settings, click Apply button to validate and save your configuration. You can always change transcoding settings by clicking Edit button at a later time. But remember setting changes won't make effect to a live channel, until the channel is restarted.
After a new transcoding channel is set up, you may enter some memo
about the channel in the list to keep it simple to identify. The red light
in the last column
indicates the channel is idle. Click Start button to start
transcoding. If everything is OK, the status light will switch to green
,
which means the channel is on-air now. You can then validate the output stream
in your end device or VLC player
(http://www.videolan.org/vlc)
, a very handy tool.
If there is any problem, please refer to FAQ,
or send feedback to support#ipvideotrans.com
with your channel settings and channel log file to get a diagnosis. To get channel
log file, enable Debug Log in Global Settings before starting the channel.
IPVTL config file and log files are located in:
To enable adaptive bitrate streaming, you need to create multiple bitrate profiles. IPVTL supports up to 5 profiles per channel, for RTMP, HLS, and MPEG TS over UDP stream formats.
To set up multiple bitrate profiles, create or delete profiles by clicking "+" or "-" button on bottom of encoding settings panel. In each profile, you can define different video sizes, bitrates and even encodings. Make sure to specify a distinguishing output address for each profile. And remember to set a same Key Frame Intv. for all profiles to keep video key frames aligned.
It's obvious multiple profile transcoding requires more computing than single profile. So consider your hardware specification wisely.
If you are streaming from Multi Program Transport Stream (MPTS), it is possible to choose which program / channel in the source stream are to be output, by picking either program # or stream PIDs in it.
PID can also be used to pass through dvb subtitle in UDP MPEG TS output format. To do that, make sure to select the correct subtitle PID in the source.
Flash Version String | Customized identification for publishing client. Leave it empty if you don't have any idea. |
SWF URL Verify | RTMP stream URL for server verification. Leave it empty if you don't have any idea. |
Publish Username / Password | Publishing authentication required by RTMP server (Both Adobe and Limelight authenticating methods are supported) |
If you are streaming into HLS format, you can specify more details about index file (.m3u8) and segment file (.ts) to be generated, including segment length, playlist entry size and TS encryption (DRM).
You can also enter a base URL if required to be put in .m3u8 index.
MPEG-TS output metadata fields can be configured here, including Program/Service ID, Program Name, Start PID and Provider Name.
Set time delay and cache file folder for output stream. The input stream will be cached and delayed exactly the time you enter before being output. Please make sure there's sufficient disk space for cache files.
For video encoding in H.264, HEVC, VPX and AV1, it is possbile to change encoding preset to tune video quality.
Profile & Level | H.264/HEVC encoding conformance. Please refer to wikipedia. |
Threads | Specify how many threads are to be used for encoding. This value can be used to tune encoding performance. |
Encoding Preset | Higher presets lead to better video quality, but at the cost of higher CPU utilization. Choose lower presets to get more smooth output on slow machines. In most cases preset value should be kept less than 6. |
Valid video quality values are 1 to 100. Higher quality value normally leads to higher video bitrate. In most cases, this option can be left as Default, indicating the same output quality as input.
IPVTL outputs video stream of variable bitrate (VBR) by default. If you want to specify video output bitrate, choose it wisely as low output bitrate could make video quality bad, creating artifacts during playback. Setting both video bitrate and video quality is NOT recommended.
Constant bitrate (CBR) stream is mostly required by legacy DVB IRDs. To set up CBR output, enter proper values for both Video Bitrate and Mux Bitrate in encoding settings. That will produce CBR stream compliant with DVB ETSI TR 101 290. Note that Mux Bitrate must be some higher than <Video bitrate> + <Audio bitrate>. In example below, video bitrate = 1600kbps, audio bitrate = 128kbps, while Mux bitrate = 2000kbps.
Key Frame Interval, formerly Key Frame Distance in IPVTL, defines time in seconds (defautls to 5) between key frames in video stream for decoders. Prior to version 5.9.3.0, it is called key frame distance and is calculated in video frames. For HLS output format, it also affects the .ts segments duration. Users just need to set Segment Length in advanced HLS options and key frame interval will be changed accordingly. If you have no idea about it, just leave it as default.
During transcoding, it is possible to overlay customized logo and image on the video. To do that, go to advanced video settings -> Overlay, and select a picture file you prefer. Supported picture formats include .bmp / .jpg / .png / .gif. Choose .png / .gif formats to overlay with transparent background.
Animated logo is also possible, by selecting an animated GIF file as logo.
To overlay timestamp, enter %timestamp as overlay text.
Audio AAC-LC / HE-AAC |
Video AOM AV1 |
Subtitle dvb/dvd |