IPTV Live Video Encoding & Streaming Manual
Installation
On Windows platform it's quite simple. Just download and run executable installer to install IPVTL to your computer. Ignore and choose to run installer if Windows Defender SmartScreen shows up. IPVTL depends on Microsoft Visual C++ 2013 Redistributable Packages so make sure it is installed before running.
For Linux users, first download and extract lzma tarball to local folder, /home or /opt for example. Remember to extract it WITHOUT changing file permissions, or IPVTL could fail to run.
Make sure prerequisite packages libva (>2.0), libva-drm and libavahi are installed before running. For example to install them on Ubuntu:
# sudo apt-get install libva2 libva-drm2 libavahi-client3
or on CentOS Stream/RHEL:
# sudo yum install libva avahi-libs
Start Linux console, go to IPVTL folder and enter command like
sudo ./ipvtl_16ch_trial or
sudo ./ipvtl_4ch to start program. Remember
super user privilege is required.
#cd /opt/opt#tar xvf ipvtl_trial-x64.tar.xzipvtl/ ipvtl/arial.ttf ipvtl/libndi.so.5 ipvtl/ipvtl.so ipvtl/ipvtl_16ch_trial /opt#cd ipvtl/opt/ipvtl#sudo ./ipvtl_16ch_trial* * * * * * * * * * * * * * * * * * * * * * IP Video Transcoding Live! * * Copyright 2009-2023 * * IPVideoTrans.com * * Version 6.3.6.0 * * 16 Channel Evaluation * * Expires on: 06/30/2023 * * To purchase licenses, please contact * * sales@ipvideotrans.com * * * * * * * * * * * * * * * * * * * * * * IPVTL starting web interface at http://192.168.1.1:8888... /opt/ipvtl#
To quit IPVTL, simply pgrep ipvtl_ to kill IPVTL process, or
just pkill ipvtl_.
IPVTL has web console built inside, making it same experience to set up and
manage channels in a web browser as to do these in Windows GUI. The web console
can be accessed at http://<host_IP>:<http_port>,
where host_IP is IPVTL's local host network interface, and
http_port is the HTTP service port configured in Global Settings,
for example http://127.0.0.1:8888/.
IPVTL web console is available on both Windows and Linux. Even Windows users may use it to set up or manage transcoding from remote.
For the first time running IPVTL license, it is required to import and activate license key in Windows UI or web console. Contact our sales at sales[at]ipvideotrans.com if you need.
Upgrading
To upgrade IPVTL, just download latest installation package and make the same steps above as a fresh install. Old configuration will be saved and recovered automatically.
Old configuation can also be exported and imported in IPVTL Global Settings. We recommend doing this in case anything unexpected occurs during upgrading.
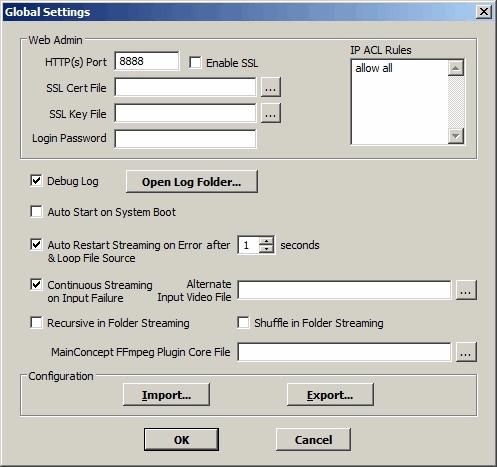
Global Settings
Remember IPVTL is built with web admin tools. The default Login Password is empty, so it is STRONGLY RECOMMENDED to set it up in Global Settings IMMEDIATELY after installation. Otherwise there is a risk of your channel details being exposed to the internet.

It is also possible to secure IPVTL web admin at IP level, using IP address ACL (access control list) rules. The ACL syntax supports both blacklist and whitelist, which is very like syntax in nginx:
# whitelist
deny all
allow 127.0.0.1/8

# blacklist
allow all
deny 1.2.3.4
ACL rules also affect MPEG-TS over HTTP streaming, so use it wisely.
If you find problems in streaming and need us to help, please send feedback to support[at]ipvideotrans.com with channel log files and configurations for diagnosis. To get channel log, enable Debug Log and restart the channel.
If Auto Start on System Boot is enabled in Global Settings, IPVTL will run automatically everytime Windows boots (after user logged in).
On Linux, you may make IPVTL autostart using cron or rc.local
scripts. For cron, enter $ sudo crontab -e under console and
add a job like:
@reboot /opt/ipvtl/ipvtl_16chFor rc.local, just edit /etc/rc.local and add IPVTL command with full path.
Auto Restart on Failure enables automatic streaming recovery during unexpected failure. It also enables infinite loop in file streaming.
IPVTL channel configurations can be backup and restored with Export and Import buttons here. Use them when you are migrating streaming computer to a new one for example.
