IPTV OTT Encoding & Streaming Channel Setup
Select Media Source
Before setting up everything, make sure of your source stream type first.
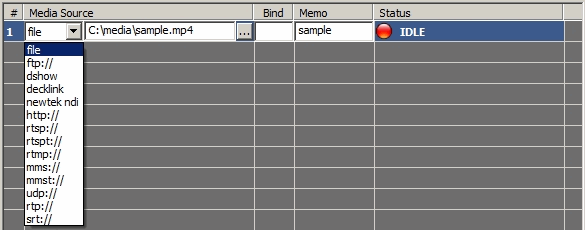
Click 🞧 New Channel button to create a new transcoding channel with default settings. In the channel list panel, select appropriate streaming protocol and enter the URL of the media source.

In channel Memo you can enter some text about the channel to make it easy to identify.
Tip: After media source is set up, click 📺 Preview to check it in IPVTL web admin. Make sure the source is working good before streaming.
Setup Output Stream
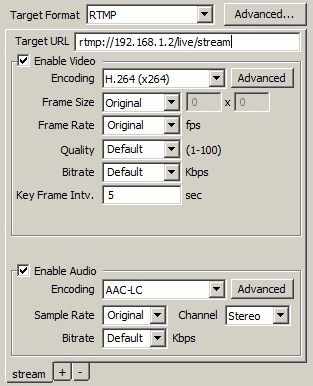
First, select target stream format you demand appropriately, among RTMP, MPEG-TS over UDP/RTP/HTTP, m3u8 Playlist (HLS), MPEG-DASH and Decklink playback card. Then enter target address and modify encoding details if necessary. You can change video resolution, frame rate, encoding profile/bitrate and audio sample rate, etc.

Once channel configuration is done, click ✔ Apply button to validate and save it. You can always change transcoding settings by clicking 📝 Edit button at a later time. But remember modified settings on a live channel won't make effect, until the channel is restarted.
Start Streaming
The status light in the end of channel list indicates the current channel
status. Click ▶ Start button to start streaming. If everything is OK, the
status light will switch to green, which means the channel is on-air. Output
video bit rate, frame rate are also displayed to show streaming health. You can
check the output stream in the end devices or VLC player
![]() (http://www.videolan.org/vlc),
a very handy tool.
(http://www.videolan.org/vlc),
a very handy tool.
If there is streaming problem, refer to FAQ,
or send feedback to support[at]ipvideotrans.com with your channel
settings and channel log file to get diagnosis. To get channel
log file, enable Debug Log in Global
Settings and restart the channel.
IPVTL config file and log files are located in:
- %APPDATA%\IPVideoTrans\ipvtl\ipvtl.json and %APPDATA%\IPVideoTrans\ipvtl\log\ on Windows
- /etc/ipvtl/ipvtl.json and /var/ipvtl/log/ on Linux
